
Configure Connect with SIP softphones
Use the common SIP softphone device pattern to route outgoing or bidirectional calls through Connect.
Prepare SIP softphones
Prepare the physical and virtual audio paths before changing SIP softphones. Connect the wired headset, open Connect, and confirm that the real microphone and speaker work in How I Sound?. Keep a record of the original SIP softphones devices so the configuration can be reversed if the test is unsuccessful.
- Connect: select the physical headset and the correct source and destination languages.
- Operating system: confirm that Connect Mic and Connect Speaker are present.
- SIP softphones: sign in with an account allowed to change audio settings.
- Test participant: use a colleague or second device that can confirm both directions.
Choose the device pair
The correct speaker depends on which side of the conversation must be translated. Always use Connect Mic for translated outgoing speech, then route incoming speech through Connect Speaker only when Connect needs to process that direction. Keep alerts and ringtones on the physical headset whenever SIP softphones provides a separate selector.
| Translation direction | SIP softphones microphone | SIP softphones speaker |
|---|---|---|
| Bidirectional | Connect Mic | Connect Speaker |
| Outgoing only | Connect Mic | Physical headset |
| Incoming only | Physical headset | Connect Speaker |
Configure SIP softphones
Follow the application-specific path below after Connect is ready. Save the device selection, then reopen the relevant settings to confirm that SIP softphones did not revert to a system default or a previously connected headset. Complete the sequence before enabling Connect on a live conversation.
- Start Connect, select the physical headset, and verify the Connect virtual devices before opening the SIP client.
- Launch the SIP softphone and sign in to the assigned account when required.
- Open Softphone → Preferences. If the client uses different labels, look for Settings, Devices, Audio, or Media.
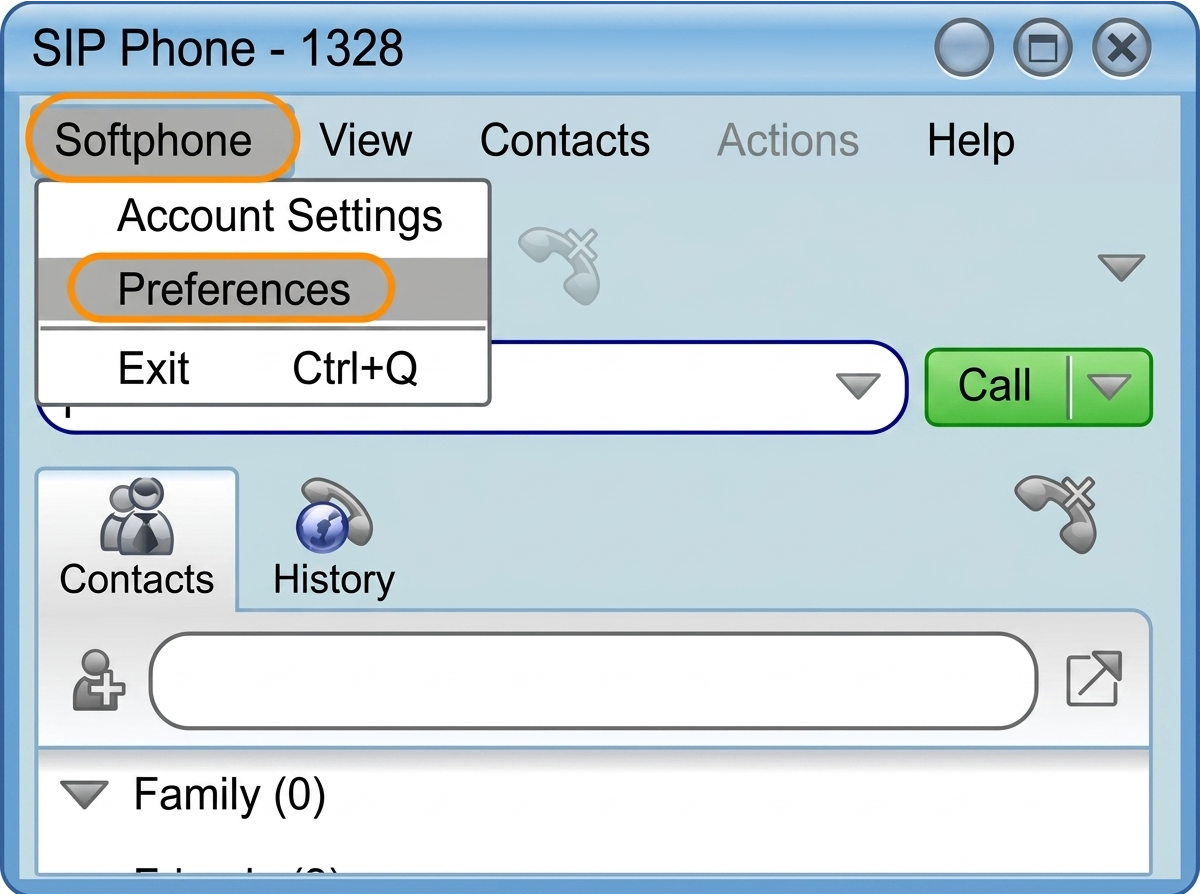
Open Softphone and choose Preferences. - Select Devices and open Headset Mode or the equivalent call-audio profile.
- Choose Connect Mic as the microphone. Choose Connect Speaker only when incoming audio must pass through Connect.
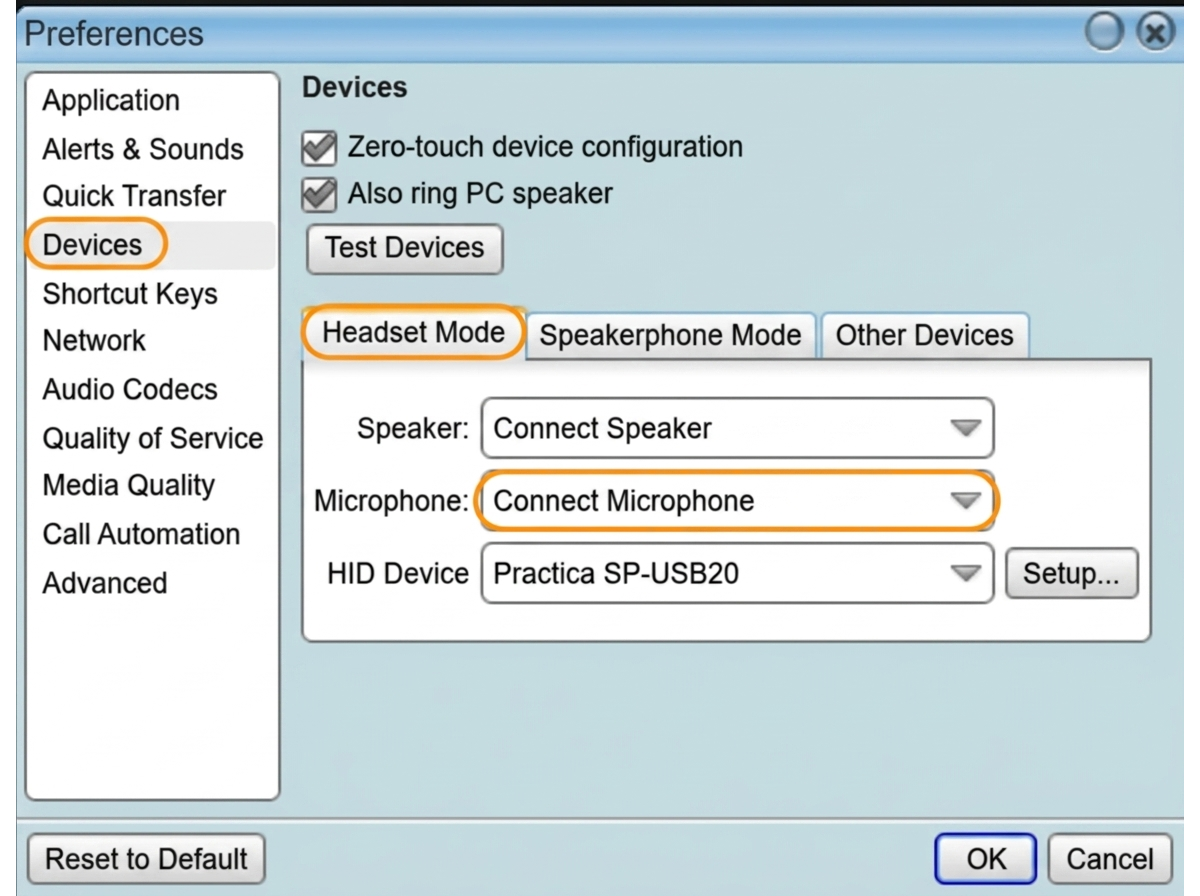
Assign Connect Mic and the appropriate call speaker in Headset Mode. - Keep ringtones on the physical headset, save the changes, and make an internal SIP call to verify both directions.
Control extra processing
A calling platform can apply automatic gain, echo control, noise suppression, or voice enhancement before Connect receives the signal. Begin with the simplest stable path and disable overlapping processing during the baseline test. Re-enable one control only when the real call environment requires it and the recipient confirms a measurable improvement.
- SIP clients vary, so use the active call input and output controls rather than matching menu wording exactly.
- Disable automatic microphone gain and noise suppression only when those controls compete with Connect.
- Verify the account uses the configured audio profile for calls, not only for device tests.
Validate the complete call
A saved setting is not proof that the integration works during an active call. Test the physical headset, Connect processing, the SIP softphones virtual route, and remote playback as one complete chain. Use the same account, network, VPN, and headset that will be used in production so the result represents the real workflow.
- Use How I Sound? to confirm a clean physical microphone signal.
- Join an internal call and verify the active SIP softphones devices inside the call surface.
- Press CONNECT-ON and confirm that the timer starts and live transcription responds.
- Speak a complete sentence and ask the remote participant what they hear.
- Test the reverse direction when using bidirectional or incoming-only translation.
- Reconnect the headset once and confirm that SIP softphones keeps or correctly restores the saved route.
Resolve common issues
Use the symptom to identify the layer that needs attention instead of reinstalling every component. Confirm the current device names before changing them, then make one correction and repeat the same test. If the issue continues, record the application version, operating system, selected devices, translation direction, and the exact point where audio stops.
| Symptom | Likely cause | Next check |
|---|---|---|
| Connect devices are missing | SIP softphones cached its device list | Open Connect first, then restart SIP softphones. |
| The recipient hears natural speech | The physical microphone is active | Select Connect Mic in the active call settings. |
| Incoming translation is silent | The call speaker bypasses Connect | Select Connect Speaker for the incoming path. |
| Speech is clipped or metallic | Competing audio processing | Disable one gain, suppression, or enhancement control and retest. |
Frequently asked questions
These answers cover the decisions most likely to change the SIP softphones result. Confirm the translation direction before applying a recommendation because outgoing-only and bidirectional calls do not use the same speaker route. Keep the last working configuration available so a failed adjustment can be reversed without disrupting the next call.
What if my SIP application uses different menu names?
Look for the controls named Audio, Media, Devices, Headset, or Call input/output. The required result is the same even when the interface differs: Connect Mic sends translated outgoing speech and Connect Speaker receives incoming speech for processing.
Which devices should I select in SIP softphones?
Select Connect Mic whenever outgoing speech must be translated. Select Connect Speaker when incoming speech must also pass through Connect; otherwise keep the physical headset as the call speaker.
Why are Connect devices missing from SIP softphones?
Close SIP softphones, confirm that Connect Mic and Connect Speaker appear in the operating system, keep Connect open, and relaunch the desktop application. Applications and browser tabs often keep the device list that existed when they started.
How do I know the SIP softphones integration is ready?
Run How I Sound?, place a real test call, press CONNECT-ON, confirm that the timer and transcription respond, and verify what both participants hear. A saved device name alone does not prove the complete route.
Support
Need help? Get in touch with our Support Team for assistance. Include the calling application, operating system, selected microphone and speaker, translation direction, and the exact step that failed. A short description of the expected result and what happened instead helps the team respond more quickly.
Was this article helpful?